
Gallery Wall Bedroom Ideas: Create Your Perfect Space
Key Takeaways
- Plan your gallery wall bedroom by measuring your space, picking an anchor piece, and keeping 2–3 inches between frames for a cohesive look;
- Above the bed, aim for the gallery’s bottom edge 6–10 inches above the headboard, with the full arrangement no wider than the bed for balance;
- Choose a calm palette, repeat 2–3 frame finishes, and mix verticals or horizontals to create flow without visual clutter;
- Use Mixtiles’ adhesive, repositionable frames to hang, tweak, and move your bedroom gallery without nails, tools, or wall damage.
A gallery wall in the bedroom should feel personal, calming, and easy to refresh. Whether you are styling above your headboard, over a dresser, or on a cozy reading nook wall, the right layout, spacing, and frames make all the difference. In this guide, you will learn bedroom-specific measurements, layouts that actually work in small and large rooms, color and framing tips for a serene vibe, and renter-friendly hanging methods, plus smart mistakes to avoid before you make a single hole.
Ready to design your bedroom gallery wall? Explore our gallery walls inspiration page, then create your own stickable photo tiles in minutes. No nails, no damage, no stress.
Where should a gallery wall go in a bedroom?
The best place is where your eyes land first: above the headboard, over a dresser, beside a vanity or chair, or opposite the bed. Each wall offers different benefits for balance, comfort, and interior design flow.
Keep the total width equal to or slightly narrower than the bed for a tidy gallery. Leave 6–10 inches between the headboard and the lowest frame so the wall decor feels connected to the furniture. When not above a bed, center the arrangement around 57 inches to the midpoint for comfortable viewing height in the room.
How do you plan a bedroom gallery wall without making mistakes?
Use these quick steps to plan with confidence:
- Measure the wall or furniture width, then mark a target rectangle with painter’s tape;
- Mock up the layout on the floor, photograph a few options, and pick the most balanced design;
- Choose one larger anchor, add medium frames, then sprinkle smaller art to finish the edges;
- Lock spacing at 2–3 inches and keep edges aligned to an invisible rectangle for clean lines.
Place your anchor slightly off-center to guide the eye across the gallery. Alternate vertical and horizontal frames to create rhythm. If one side feels heavy, offset it with lighter or more open wall art on the other side for even visual weight.
Which layouts work best above a bed or dresser?
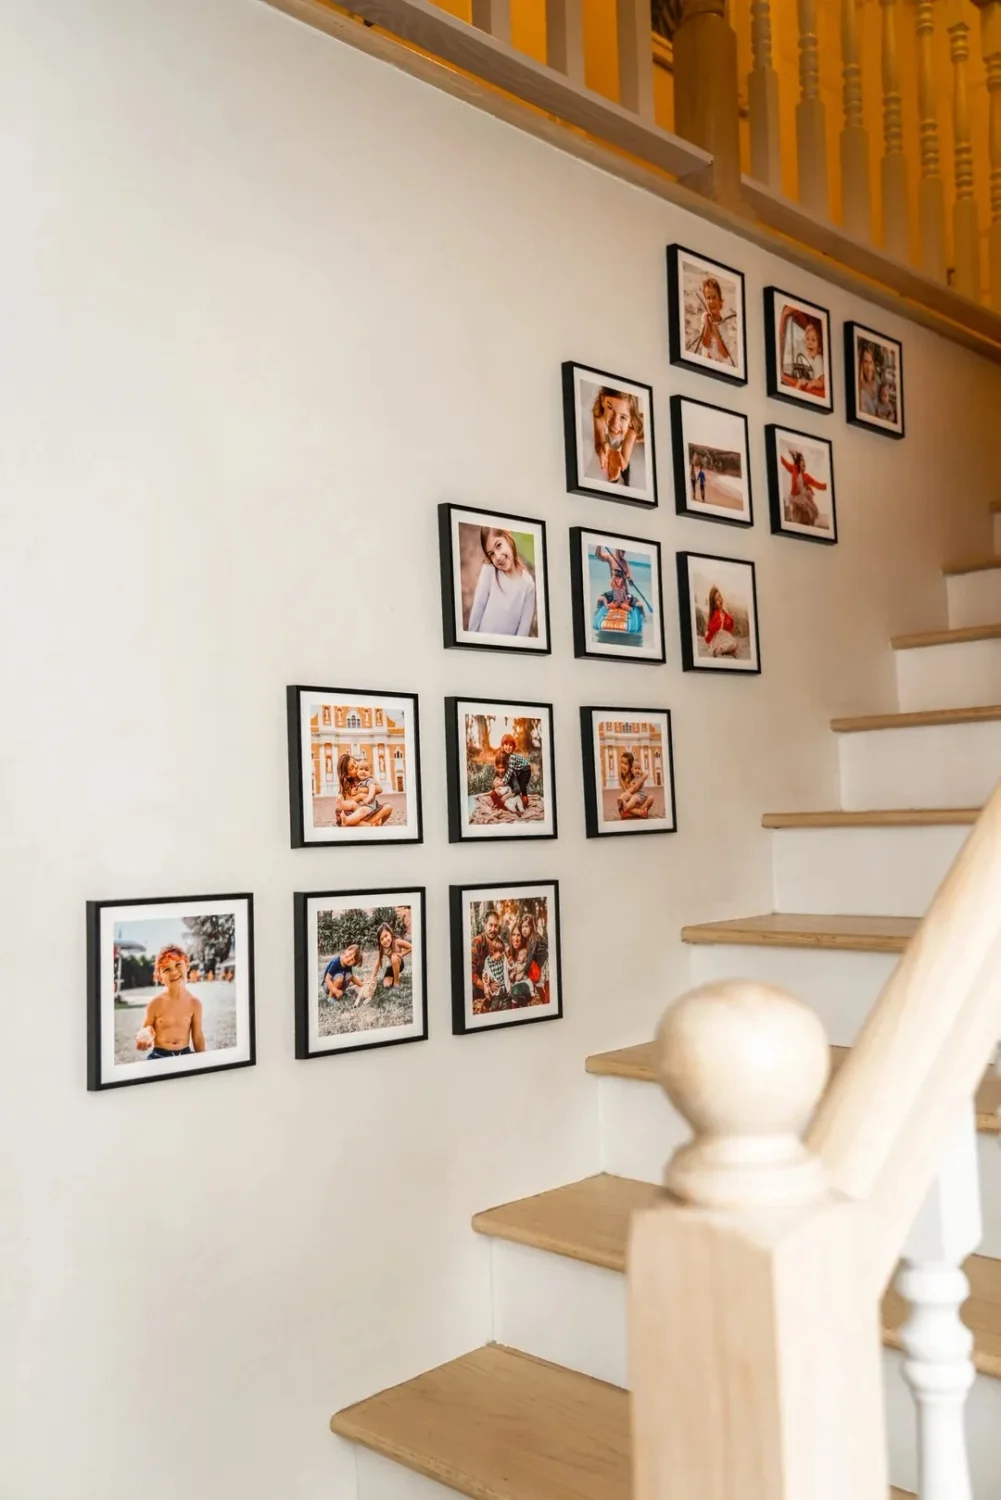
The most successful bedroom gallery walls are simple, contained, and restful. Choose a grid for symmetry, an organic cluster for character, a triptych for modern lines, or a vertical column for small walls.
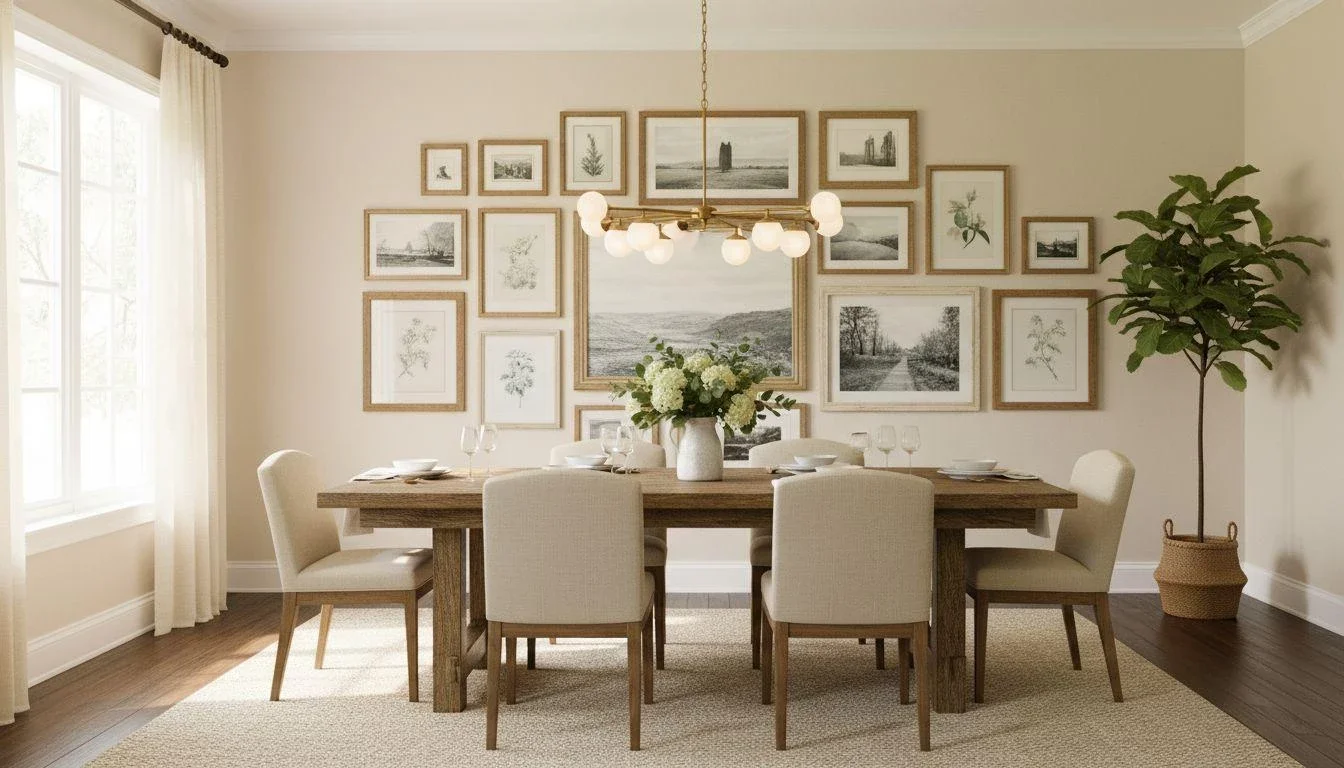
Calm grid, above a bed

A 2×3 or 3×3 grid feels tidy and serene. Uniform Mixtiles sizes in white or light wood frames pair well with neutral bedding and create a cohesive gallery wall.
Organic cluster, above a dresser

Start with a medium anchor over the dresser center, then stagger frames around it. Keep the outer boundary rectangular so the decor reads as one contained design.
Triptych or linear row, over a low headboard

Three equal frames in a row deliver a hotel-like look. In a narrow room, try a single horizontal row of four or five smaller framed photos to elongate the wall.
Vertical column, beside the bed or vanity

Stack three to five frames to maximize height and save floor space. This is ideal for small rooms, reading corners, or tight walls near closets.
Quick size recipes
|
Placement |
Recommended total width |
Clearance above furniture |
Tile count and size suggestions |
|---|---|---|---|
|
Queen bed |
60–66 in, 152–168 cm |
6–9 in, 15–23 cm |
6–9 tiles like our popular 8x8 canvas prints or 8x10 in; mix one 12×12 canvas print in anchor for variety |
|
King bed |
70–78 in, 178–198 cm |
6–10 in, 15–25 cm |
9–12 tiles at 8×8 in or 10×10 in; consider a 3×3 grid |
|
Dresser |
Match dresser width, usually 36–60 in, 91–152 cm |
Start 4–6 in, 10–15 cm above surface |
5–7 tiles at 8×8 in with one 12×16 in accent |
|
Narrow wall |
26–36 in, 66–91 cm |
Centered on eye level |
Vertical stack of 3–5 tiles at 8×11 in |
Need help translating your wall width into print dimensions? Check out our canvas sizes for walls guide for room-by-room recommendations and layout pairings.
Want a classic, textured look? Preview your layout with our app, then turn your favorite photos into beautiful canvas prints online. They arrive ready to hang, adding timeless style to your bedroom wall.
How do you choose art and frames for a restful bedroom?
Pick a soothing palette that echoes your bedding, curtains, or rug. Soft neutrals, warm earth tones, and gentle blues or greens keep the gallery calm. Mix personal photos with a few abstracts or landscapes to balance detail and negative space. Repeat two or three frame finishes like white, black, and light wood for cohesion. Add printed borders to create elegant breathing room within each frame and to elevate small photos on larger walls.
What if your photos are all different?
Unify them with a simple trick like converting a set to black and white. Use identical frame sizes for varied art so the gallery reads as one. Repeat subjects like travel, nature, or family moments (which you can also preserve in a beautiful family photo book) to tell a consistent story across the wall.
What are the exact spacing and measurement rules you should follow?
Keep 2–3 inches between every frame to form clean visual “roads.” Leave at least 6 inches above the headboard for comfort and 8–12 inches from wall edges so the gallery does not feel cramped. Aim for one unbroken horizontal or vertical spine through the arrangement to tie everything together, especially in grids or linear rows.
Choose lightweight frames for above-bed walls. Mixtiles are featherlight, and frameless options like our canvas photo prints contain no glass, which supports a serene and safe bedroom. In quake-prone areas or kids’ rooms, avoid heavy objects over beds. Always plan around switches or thermostats so your gallery walls look intentional and uncluttered.
How do renters hang a bedroom gallery wall without damage?
Use adhesive, repositionable frames like Mixtiles. Stick, straighten, and re-stick as many times as you want until spacing is perfect. Our stick-and-restick adhesive and optional magnet system keep your walls clean. When you move to a new home, take your gallery wall with you and rebuild the design in minutes.
What common mistakes should you avoid, and how do you fix them fast?
Here are the top pitfalls and quick solutions so your decor stays fresh and balanced:
- Too many tiny pieces, no anchor: fix by adding one larger tile or converting several small photos into uniform sizes;
- Inconsistent spacing that looks messy: fix by using a 2–3 inch spacer cut from cardboard for every gap;
- Colors that fight the room or white walls: fix by harmonizing with textiles, or convert a set to black and white for instant unity;
- Gallery wider than the bed or furniture: fix by pulling edges inward so total width matches the furniture footprint.
A bedroom gallery wall should feel intentional, balanced, and effortlessly personal. Start with the right spot and measurements, choose a calm palette, keep spacing consistent, and build around an anchor piece. For renters and anyone who wants zero stress, adhesive, repositionable frames make planning and hanging simple and safe above a bed. With these rules of thumb and a few favorite photos, your gallery wall bedroom will look curated, cozy, and uniquely you.
Build your dream photo gallery wall with Mixtiles today. Browse our full collection of wall arts and start creating a space that’s uniquely you. Reposition anytime without tools or damage.
Frequently Asked Questions
Are bedroom gallery walls still in style for 2026?
Yes, gallery walls remain popular in 2026, especially in bedrooms. The look is more edited: calm palettes, cohesive frames, and simple grids or tight clusters. No‑nail options like Mixtiles keep the trend practical. Easy to hang, tweak, and refresh without damage.
How do I create a gallery wall above a bed?
Measure your bed and keep the gallery equal or slightly narrower. Plan on the floor or in the Mixtiles app, choose an anchor, then add pieces with 2–3 inch gaps. Hang the bottom edge 6–10 inches above the headboard. Use lightweight, repositionable frames.
What are the key rules for a bedroom gallery wall?
Keep 2–3 inches between frames, leave 6–10 inches above a headboard, and maintain 8–12 inches from wall edges. Center non‑bed layouts around a 57‑inch midpoint. Align to an invisible rectangle so the arrangement reads as one balanced, contained composition.

Be the first to know — deals, news & decor ideas.
By clicking you agree to the Terms of Use & Privacy Policy